Scan, Restore, Archive, Print
Introduction
These pages are about scanning, archiving and printing my collection of old photographs, mostly of family and friends.
In addition to this introduction, I have four pages each dedicated to sub-topics: scanning, restoring, archiving, and printing (the last two are still in draft). I also plan a fifth page on cameras.
Originally I had a single webpage documenting the use of my scanner, the HP Scanjet G4010. I had 'played' with it in the past to scan some old photos, etc., but had never got round to implementing any photograph restoration options and workflows.
More recently (2017) I decided to re-initialise everything, and more or less start all over again. Why the renewed enthusiasm? What changed?
Firstly, I had some 20-odd old photo-albums sitting on shelves, plus at least 4 “shoe-boxes” full of assorted photographs, plus nearly 1,000 slides, plus a collection of over 1,000 negatives dating back to early 60’s, plus lots of b&w family photographs from the ‘distant past'. Not to mention more than 16,000 digital photographs sitting in cloud storage.
As you probably have guessed these old photographs, slides, negatives, etc. just sit on shelves, taking up space and collecting dust. We never really look at them, and in the vast majority of cases they are tourists snaps with no intrinsic value. Of course they represent memories, but those memories are usually enshrined in a few key photographs of family, friends, or particularly significant views (landscapes, monuments,…). But only by going through the albums, envelopes, boxes, etc., can we really decide what to keep and scan, and what to discard.
Secondly, increasingly friends and family are sending us old photographs that they have scanned, so it was time to reply by send them some old photographs scanned from our collection.
Thirdly, about half of the photographs that we had on display around the house were faded, and needed to be refreshed and re-printed.
Lastly, we changed our computers recently, and I was now able to dedicate an old ‘white' MacBook just to running the scanner.
This meant completely re-formatted a mid-2011 MacBook (2.4 GHz with 2 GB RAM) and re-loaded OX 10.6.8 (Snow Leopard).
Why not upgrade to the latest OS X, and use Apple's latest version of Image Capture? My old MacBook was the last model that would upgrade to Sierra, but the performance was so bad that I would not recommend it to anyone. The reason I actually tried the upgrade in the first place was to migrate from iPhoto to Photos, but because of the poor performance with Sierra this proved to be a mistake. It made the old MacBook almost unusable. Now my wife has a new iPad Pro, and she is again happy. So I decided to allocate the old MacBook to just doing scanning.
I also could not find a way to just upgrade Apple’s Image Capture. Although there are a number of apps that claim to be better than Image Capture, but do they still run under Snow Leopard? So my initial approach was to stick with native apps (Apple, HP, etc.) that I hoped would be stable and do the job! It did not take me long to change my mind, but for now I will walk through my learning experience in the hope that it will be useful to others.
So it was time to get rid of most of our old photo collection, free up some shelve space and move valuable family photographs on to my computer and in to cloud storage.
My initial approach to this new set of pages was to document chronologically my decisions concerning what to scan, how to scan, and what I needed to learn in order to do justice to my old photographs. In addition I knew I would need to understand better the problems of archival, and finally how best to print, or re-print, some of the archived photographs.
I had hoped that these pages would describe a string of logical decisions. I knew that I would need to learn a new vocabulary and skill set, and that I might initially decide one thing, and then later be obliged to re-think and decide differently. But how difficult can scanning a few photographs be?
Things started out well….
HP has a Webpage dedicated to software and drivers for the HP Scanjet, which includes links for the user guides, software and drivers. Downloading the drivers created a folder ‘Hewlett-Packard' containing HP Scan, Uninstaller, and license.txt.
You can also easily find on the HP Website the following manuals:
HP Scanjet G4000 series - Setup and Support Guide
HP Scanjet G4000 series - User Guide
My HP Scanjet G4010 is connected to the MacBook using a USB cable. The scanner automatically appeared in System Preferences, offering a variety of services such as putting PDF files in the Documents folder, sending a PDF by email, and opening the HP Scan software.
Start by testing my ‘installation'
Starting with the Setup and Support Guide (downloaded from the HP Website) the first real check was when it told me to test the installation. So I placed a colour photo (actually just a postcard) in the top right-hand corner on the scanner bed, and pressed ‘Scan’ on the scanner lid. The Guide said that this would open the HP Scan application.
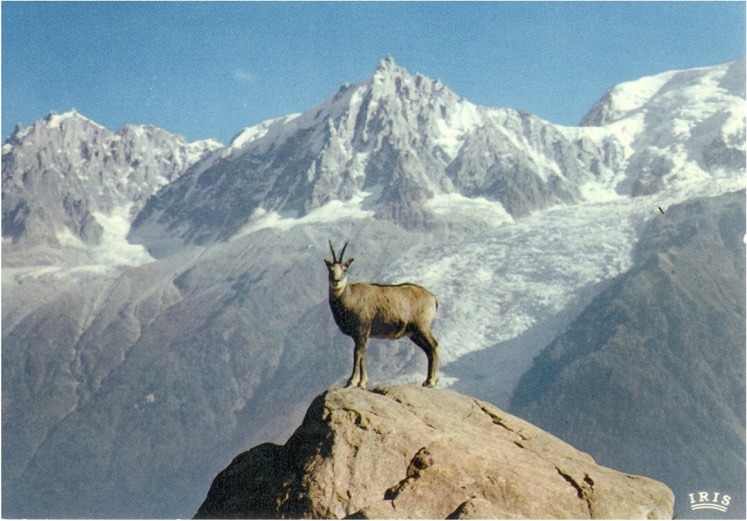
My first ‘test' photograph was in fact a postcard, and we can see immediately that what was said to be a Chamois (Rupicapra rupicapra) has been ‘photoshopped' into the view. To be more precise, it is in fact a Isard (Rupicapra pyrenaica), a kind of small Chamois that is famous in the Aosta Valley in Italy.
Pushing the scan button on the top of the scanner did not open HP Scan but opened something called Image Capture, an application (program) from Apple. In the HP’s ‘troubleshooting’ section it just said to use the HP Uninstaller to uninstall their software, and then reinstall it. But that made no different at all, and pressing ‘Scan’ still opened Apple’s Image Capture and not the HP Scan software. On the other hand, the HP Scan application could also be opened from the applications menu, and it offered scan options which looked to be similar to the Apple Image Capture application.
So this meant we had two options for controlling our HP Scanjet G4010.
Using Apple’s Image Capture
We have to remember that my old MacBook was (is still) running Snow Leopard (i.e. OS 10.6.8) and not the latest version of OS X. As such Image Capture was version 5.0.3 and not the latest version (6.8 or later).
The default scan for my old version of Image Capture was a ‘good’ quality JPEG image with a file size of 434 kB. The size of the image was defined as 1160 x 808 pixels, scanned at 200 pixels/inch with a generic RGB colour profile (an additive colour space defined by red - green - blue).
Both the old and new versions of Image Capture offered the usuals image file formats - BMP Microsoft (a bitmap format), GIF (a bitmap format called Graphics Interchange Format), JPEG an image file format usually associated with some form of lossy compression), JPEG2000 (a format designed to supersede JPEG), PDF (Portable Document Format), PNG (Portable Network Graphics, another raster graphic file format), and TIFF (Tagged Image File Format).
The file formats in Image Capture had the following characteristics:
The TIFF was a 12.2 MB file, using the Adobe RGB colour profile. The size of the image was 2417 x 1684 pixels, with 150 pixels/inch.
The PNG was a 5.5 MB file, using the Adobe RGB colour profile. The size of the image was 2417 x 1684 pixels.
The PDF was a 7.8 MB file, presented as an A4 page.
The GIF was a 2.3 MB file, using the Adobe RGB colour profile. The size of the image was 2417 x 1684 pixels.
JPEG permitted to select a ‘quality’ between min. and max. The JPEG min. was a file of 211 kB, the JPEG max. was a file of 5.2 MB, and the ‘good’ JPEG file was 372 kB (again with an image size of 2417 x 1684 pixels). My guess is that max. meant close to lossless.
The lossless JPEG2000 was a file of 2.1 MB, also with an image size of 2417 x 1684 pixels.
One problem was that the default ‘Scan button’ on the top of my Scanjet scanner opened Image Capture, but provided no control over the parameters of the scan. However Image Capture did provide some control over the image once scanned but before saving it. You could rotate, zoom, crop, etc., and there was a tool for manipulating the colour in the image. As far as I could see there was no way to re-scan with a higher resolution, etc. Naturally I am talking about version 5.0.3, whereas the latest versions (e.g. 6.8 in Sierra) allowed quite a selection of parameters, including the ‘resolution’, format, etc., and the option to re-scan.
Using the HP Scan software, with default settings, the image files were different
HP Scan offered fours types of operation: Documents, Pictures, Slides, Negatives, and for each a sets of three features under the headings, Capture, Adjust and Enhance.
Capture provided for colour, grayscale, black & white, resolution with a finite number of steps (pixels/cm), crop and straighten, and options for ‘higher bit depths’ and 'optimum colour accuracy'.
Adjust provided for a number of colour options (adjust colour, boost colour (vivid colour), invert colour), exposure options (adjust exposure, adjust black and white threshold), and noise reduction options (sharpen and descreen).
Enhance provided for the application of Adaptive Lighting, the restoration of faded colour, and the removal of dust and scratches.
The TIFF was a 2.8 MB file, using a generic RGB colour profile. The size of the image was 1160 x 808 pixels, with 200 pixels/inch.
The PNG was a 2 MB file, using a generic RGB colour profile. The size of the image was 1160 x 808 pixels.
The PDF was a 607 kB file, presented as a small postcard.
The JPEG max. was a file of 2.2 MB, and JPEG 2000 max. was a file of 2 MB, both again with an image size of 1160 x 808 pixels.
Opening HP Scan provided a start menu with standard ‘profiles’ for documents, images, slides, and negatives. You could open the profile parameters and see (and change) the capture and processing parameters to be used. The default was colour, with a resolution of 79 pixels/cm (i.e. 200 pixels/inch), and included the identification and framing of the picture on the flatbed (not always perfect so I still sometimes had to manually defined the scanning frame). There were series of options such as one to enhance colour depth, i.e. use more bits to define the colour in each pixel.
The other options involved image adjustment, i.e. making the colours more intense, altering the exposure, and removing noise and artefacts. Options were also available for improving faded colours, and removing dust and scratches.
With the default setting, an image of the entire flatbed surface appeared, e.g. my photograph stuck in the top left-hand corner. And the software automatically identified, framed and selected the “output” image. I just had to pick the format to file (save) it.
What is the difference between Apple's Image Capture and HP Scan?
Making a very subjective assessment and based upon the default options for both Image Capture and HP Scan, in my opinion the ‘best’ images were provided by TIFF followed by the lossless JPEG2000 format made by either Image Capture or HP Scan.
Between the HP Scan software and Apple’s Image Capture (older version), my preference was for HP Scan. It provided more flexibility than Image Capture (at least for the old version 5.0.3).
Practical tests
The use of the postcard was really just to discover the basic operations of the scanner with both Image Capture and HP Scan.
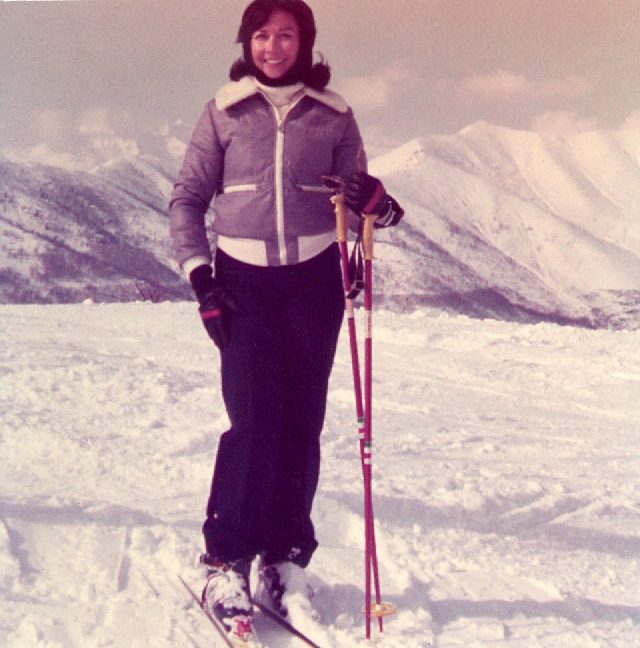
Having decided to use HP Scan l then decided to run a series of tests with a small collection of photographs. Firstly, a family ‘snap’ taken indoors about 10-15 years ago. Second, a high-quality photograph taken outdoors about 30 years ago. Thirdly, a family photograph taken some 40-odd years ago, and very faded. Lastly, a B&W school photograph taken close to 60 years ago.


The simple family ‘snap’ (above) was scanned at 300 dpi, and originally archived as a 12.6 MB TIFF file. Tests clearly showed that there was absolutely no advantage to scanning this photograph at more than 300 dpi. Simply scanning at a higher resolution did not ‘create’ more detail (information). It just extended the scan time and required a much large file size, for no tangible gain. Also tests involving both TIFF and JPEG2000 formats show no differences, except possibly a subjective improvement in the skin tones using JPEG2000.
Concerning the second image, taken some 30 years ago using an SLR camera, I could detect no differences between different scanning options, suggesting that even for a good-size, good-quality photograph there was no reason to scan at resolutions above 300 dpi. Also there appeared to be no difference between the TIFF and JPEG2000 formats.
HP Scan offered 'higher bit depth' as an on/off switch. The HP Scanjet G4010 was sold as a 6 colour 96-bit scanner, so I expected to see a substantial difference when switching on the ‘higher bit depth’ option. But what did it mean? The only information I could find was a statement that the term 6-colour referred to the amount of information collected for each pixel during the scan, and not the number of colours in the output. The technique was said to result in a more realistic reproduction with greater colour accuracy.
Given that I was less than impressed by both Apple's Image Capture and HP Scan I decided to buy Pixelmator.
With Pixelmator it was possible to inspect the RGB histograms for the HP Scan 'higher bit depth' option either on or off. Switching on ‘higher bit depth’ did appear to smooth the histogram form, in particular for blue, and to a lesser degree for green. In smoothing the histogram the peaks were also very slightly flattened. A narrow peak in the histogram just means that there were a lot of pixels with that intensity level. Peaks that are smoother and slightly flatter would imply that some pixels in a high intensity channel have moved to a nearby channel, spreading the peak and creating a slightly more subtile tonal variation. Is this because more independent pixel readings are being included? Is it because more pixel readings are being used to average a result for each pixel? HP provides no information on this, so who knows?
HP Scan also offers an on/off option called 'optimum colour accuracy'. Generally speaking colour accuracy means the ability of a light source to reveal the colours faithfully in comparison with an ideal (or natural) light source. Since we do not know exactly what HP meant by “optimum colour accuracy“ it could also be related to colour appearance, which is related to brightness, lightness, colourfulness (chroma, saturation) and hue.
Again using Pixelmator it was possible to inspect the RGB histograms for the on and off options. Switching on ‘optimum colour accuracy’ produced two distinct effects. The first effect was the same as when switching on ‘higher bit depth’, a smoothing of the RGB histogram shapes, particularly noticeable for blue (but this time no slight flattening of the peaks). The second effect was to shift the red peaks away from white. The effect was small but noticeable. There was a smaller shift in the green, but not in the blue. This shift appeared to affect all the peaks nearer white, and the effect was more noticeable the near the peak was to white.
A simple visual check of the resultant images showed no visible effect with ‘high bit depth’, and a small subjective improvement with ‘optimum colour accuracy’. The question I had was why would anyone want to make a scan with a non-optimal colour accuracy and a lower bit-depth?
Below we have a 682 kB JPEG2000 imaged scanned using HP Scan at 79 pixels/cm (i.e. 200 dpi) with all options switched off in HP Scan. And further below we have the same image (782 kB file JPEG2000) but with the ‘improved colour depth’, the ‘adjusted colours’, the ‘adaptive lighting’, and the ‘restored colours' options switched on.

On the topic of colour restoration I decided to look at a 40 year-old photograph (above) where (a) I knew the context and had an expectation concerning the image, and (b) one that had been constantly on view for the 40 years and was faded with age. My conclusion was that colour restoration was fantastic. Forcing the scanner to a higher resolution produced the warning message that it was pointless given the quality of the original. In fact forcing the scan to 472 pixels/cm (1200 dpi) produced a very long scan time, an exploded the file size from 782 kB to 22.3 MB, and no appreciable different in subjective quality!
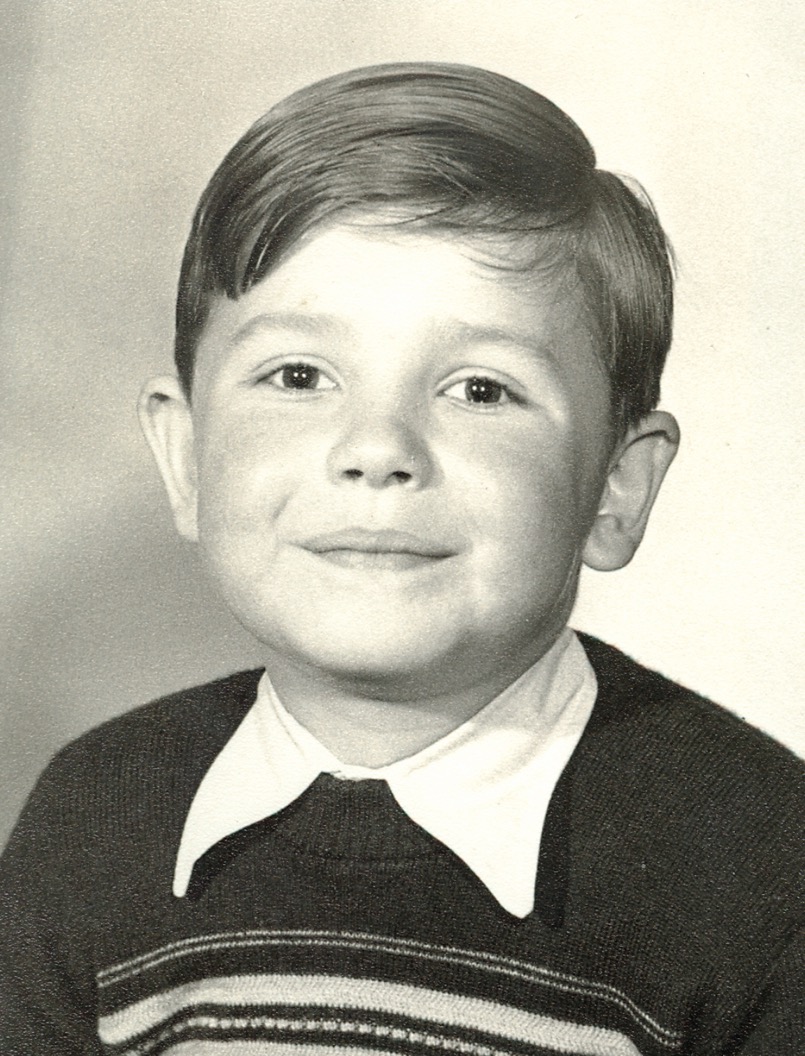
The final example is a 3 1/2” x 5 1/2” b&w photograph taken some 55-60 years ago by a professional photographer and printed at the time by a professional photoshop. They are all colour scans and archived as uncompressed TIFF files. The first was scanned at 200 dpi (4.5 MB), the second scanned at 300 dpi (10.1 MB), the third scanned at 400 dpi (18.2 MB) and the last scanned at 600 dpi (40.4 MB).

Moving from a scanning resolution of 200 dpi to 300 dpi did produce (maybe) a slight improvement in the pattern on the pullover, but scanning in excess of 300 dpi was simply counterproductive.
Change of direction
In parallel with the above tests, I started to read about scanning technologies and techniques for restoring old photographs.
My initial position was to keep my ‘scanning station’ (the flatbed G4010 scanner and the dedicated old MacBook) as simple as possible, and use native software (Apple’s Image Scan and/or HP Scan).
My ‘initial position’ only lasted a few weeks, before a series of major irritations set in! And these were …
My first major irritation was that I found it impossible to actually find a detailed technical description of the ‘insides’ of my scanner. I could not find details on the CCD used, the way colours are actually processed, or even information of the way the scanner physically works, e.g. mirrors, lens, etc.
The HP Scanjet G4010 was initial marketed as different and better than the ‘classical’ flatbed scanner available at the time. A good ‘classical' flat-bed scanner meant CCD scanning technology, an optical resolution between 1200 x 2400 dpi and 4800 x 4800 dpi, some system of software enhancement possibly up to 19,200 dpi, and colour (bit-depth) described by either 24-bits, 36-bits or 48-bits, and with an 8-bit grey scale (256 levels of grey). Traditionally the light source was a fluorescent lamp, but today it is often an LED.
My old but ‘different’ HP G4010 is also based upon CCD scanning technology (also with a cold cathode fluorescent lamp), but it has an optical resolution of up to 4800 dpi and a hardware resolution of 4800 x 9600 dpi. HP claims that the resolution is selectable from 12 dpi to 999,999 enhanced dpi. The grey scale is also 256 levels, but the bit-depth is 96-bits with 6-colours (they claim a 40% improvement in accuracy of colour capture). This 4800 x 9600 dpi scanner is said to be particularly well adapted to scanning slides and negatives. At the time this scanner was the top-of-the-range for non-professionals.
My second major irritation was that HP does not provide a decent set of detailed explanations concerning the meaning of all the options in HP Scan. What do these options really mean, what do they do, how to use the options effectively, what are the pro’s and con’s, and even which ones to avoid (if any)?
The lack of a detailed explanation is all the more important since all the options are simple on/off switches. I think it is essential to understand what a particular on/off switch does.
The different tests I performed with my 4 test photographs revealed another problem. HP Scan offered more flexibility that the old version of Image Capture. I had scanned my four test photographs with and without the various options available in HP Scan. Some of the options made a noticeable difference to the scanned image, others did not. The ‘restore colour’ was particularly effective. The question arose, what did the options in HP Scan actually mean? It must be said that Apple does not offer a detailed explanation of how Image Capture works either. Neither Image Capture or HP Scan have technical manuals.
As an example of the opaque operation of HP Scan I found that it would by default save TIFF files with 16-bits per colour channel, and with a generic RGB colour profile (for some reason it defaulted to 8-bits per channels only for the test scan of my postcard). HP Scan would by default save JPEG2000 files with 8-bits per colour channel, and with sRGB colour profile. For a colour scan of a B&W photograph it would save a TIFF file with 8-bits per colour channel, and with a generic RGB colour profile.
Selecting only the colour depth option produced a TIFF file with the same 16-bit per colour channel, and with a generic RGB colour profile. But for any other colour adjustment and/or image enhancement (but excluded the colour depth option) HP Scan would save the TIFF with 8-bits per colour and a generic RGB colour profile. However for any selection of options that included the colour depth option HP Scan would continue to save TIFF files with 16-bits per colour channel, and with a generic RGB colour profile.
Just as an aside Apple’s Image Capture stored both TIFF and JPEG files with 8-bit per channel, but with the Adobe RGB (1998) colour profile. On the other hand with JPEG2000 it used as default the sRGB colour profile.
I can find nothing about how or why these defaults are used. In addition, neither Apple nor HP have handbooks about what the different features in their software do, how they work, how to use the features, how to make the best use of the software and how someone might integrate it all into their workflow.
My third major irritation was my inability to relate the on/off options in HP Scan to those routinely found in various scanning and imaging software packages. For example, how to make colour adjustments, what did the auto-enhance options do, can hue and saturation be changed and how, how does sharpen and colour restoration work, …? And this does not include other questions such as how the calibration of the scanner is/was performed, and can it be re-calibrated, and how?
My fourth major irritation was that archival experts advise that most, if not all, of the options available in scanning software should not be used. So, without a clear idea of what the different options in HP Scan did, we were left with the only option, namely switch all options off. Yet experts on photograph restoration advise that the histogram be viewed and adjusted as necessary before scanning, in order to ensure that followup restoration can work with the widest tonal range possible. So not only did we not know what HP Scan actually did, but in addition it did not offer any access to the RGB histograms.
Conclusion
I had not anticipated that the HP Scan software would be so opaque as to be useless, and that I would become rapidly frustrated in trying to understand how my scanner works and what HP Scan software did and did not do.
The result was that I simply gave up on HP’s software and I went out and bought VueScan and Pixelmator.
VueScan a scanner package specifically designed with drivers for old scanners.
Pixelmator an image editing app.
References
I have drawn from many sources on the Web, but I would like to acknowledge the many useful articles in Wikipedia, as well as the Cambridge in Colour tutorials, ‘Digital Restoration' by Ctein, and 'Preserving History: How to Digitally Archive and Share Historical Photographs, Documents, and Audio Recordings'.